Pages

Saturday 13 April 2019

Happy Easter!

Hello friends,

Today I am sharing a few cards I made this week using some cute Miss Kate Cuttable images available on Cricut Design Space and some of the gorgeous Easter papers from two sets I picked up a few weeks ago - Easter Wishes by Lori Whitlock & Happy Easter from Echo Park.

I used the print and cut feature in Design Space to print the cute images and then popped them up on some foam tape on the card bases.  I made a selection of center step cards and regular A2 size and think they turned out super cute!


Saturday 9 March 2019

A Chocolate Explosion!

Hi Crafty Friends!

Here in Arizona, Spring has arrived at last after one of the wettest February's on record!  Having said that, today is rather dull and grey, but this past week has been beautiful and the desert flowers are finally beginning to peek their heads above the ground for their brief but colorful visit.  Hope Spring has arrived where you are!

This week was The Teen's birthday - can't believe he is 17!  Thinking of birthday cake ideas for teenage boys is always a challenge, especially as they become 'too cool for school' and so I thought I would share what I eventually came up with in case it's a struggle for you too!  I made a similar cake for him a few years ago which went down well, so I just changed it up a bit.

This Chocolate Explosion Cake is so quick and easy anyone can do it and yet it looks so impressive!


Start off with your favorite chocolate cake - approx 8" diameter.  You can either make your own or if time if short, you can totally cheat and buy a ready made one like I did :). If you are going to make your own you will also need to cover the finished cake in frosting so that all those yummy chocolate bars have something to stick to (I just bought a chocolate fudge cake from my local grocery store - job done!)

Then, using a little chocolate frosting (again, you can use ready made - I used Betty Crocker Milk Chocolate Frosting) just stick everything on! That's it!  Everyone will think you're a cake maker extraordinaire, when really it just took a few minutes.  My kind of cake!

You will need 10-12 large size 4 finger KitKats, I used 10 (well, actually I think it was 9.5 because I ate 2 fingers, LOL).   Carefully break each of them into 2 finger chunks and spread a little frosting onto the back of each one and stick to the sides of your cake.  Then, using an assortment of the recipient's favorite chocolate bars and candy, just arrange as you like on the top using more frosting as your 'glue'.  You need some tall candy bars for the back of the cake - I used Oreo bars, Twix and Lindt chocolate bars, then I added Rolos around the edge of the back half (I bought two individual packets but if you want to to go all around the cake you will need more).  I filled in all the gaps with Maltesers (found these at Target) and M&Ms and finally added the candles.  I don’t think it took more than 40 minutes from start to finish!


Hope this helps to solve your birthday cake dilemma next time you need one.  No chocolate lover could fail to be impressed!


Sunday 10 February 2019

Yoda Best!

As Valentine's Day is fast approaching, I though I would share a quick tutorial on how I turned one of the cute images from the Star Wars - Size Matters Not digital cartridge in Cricut Design Space to a Print then Cut file that I could color in to make this fun card.  Of course, this card doesn't have to be for Valentine's Day, this would work at any time of year.  In fact, I am planning to make 14 of these for Mr B's team incentive card for March 😊


There are so many cute images on this cartridge, and if you or any of your family & friends are Star Wars fans then it is a must!  It is not included in Cricut Access though so you do have to purchase it, but I think I will get a lot of use out of it so it was definitely a must for me!


These images are essentially designed for vinyl and therefore they are just a line image and have no background, so in order to turn them into a Print then Cut image that you can color, you need to create one.  This is really easy to do.  I have detailed the steps below:

1. Select Yoda - or any other image that you would like to turn into a Print then Cut, the process will be the same.


2. We need to make the second image just an outline image and remove all the cut lines except the outline, so Click Contour and then Hide All Contours.


3. Click back anywhere on the canvas.  Now we have a background shape to attach the line image to.


4. Next we need to change the color of the background image to white so that we can can make it into a print then cut file (otherwise it will just print as a solid black shape).


5. Move the line image over the top (you may need to bring this image to the front to see it)


6.  Select both shapes by clicking and dragging a box around them and click Flatten. 


7. Ta da!  Now we can have a black & white Print then Cut image and we can proceed as for any other Print then Cut image by clicking Make It on top right hand corner.


I colored mine with my Spectrum Noir alcohol markers but you could use regular colored pencils, watercolors or any other coloring medium that you prefer.


Then I created a regular A2 card base in white and added a black mat and another white mat and mounted Yoda on some foam tape for a little dimension before attaching him to the front.  I used the Star Jedi font from Dafont.com to create the sentiment and added a black mat behind before mounting this on foam tape also and adding to the bottom of the card.


Thanks for visiting!

TTFN x

Saturday 9 February 2019

What a Bobby Dazzler!

Morning!

How is your Saturday going?  I think Saturday mornings have to be my favorite time of the week.  An extra lie-in and indulgent time in bed with a coffee and my iPad catching up my everybody's news whilst The Teen is still dead to the world and Mr B is watching the footie in the other room.  Well, I say 'watching' ... a more accurate description would be pacing up and down the living room whilst periodically shouting "Nooooo!", "THAT WAS A PENALTY!" or screaming coaching advice at the players - does he know they can't hear him?  SEAGULLS!

Anyway, I digress ... whilst finishing up my second cup of coffee I just happened to flick to The Food Network channel (my other favorite Saturday morning activity) and caught Bobby Flay making some heavenly concoction with puff pastry, chocolate hazelnut spread (let's face it, it was Nutella) and chocolate chips.  Whaaaaa?!  Genius!

It just so happened that I had a pack of Puff Pastry in the fridge that needed using up and all the other ingredients in the pantry - love it when that happens! 🙌.  Anyway, it was soooo good guys and so easy to make, I just had to share (well, not the end result - I wasn't sharing that with anybody - just the recipe!)


All you need is the following:

1 x Pack of puff pastry (defrosted if frozen)
1/2 cup chocolate hazelnut spread
1 cup of mini chocolate chips
1 egg + 1 tsp water, beaten

First heat oven to 375℉ (190℃).  Then mix half a cup of chocolate hazelnut spread with a cup of chocolate chips - Bobby recommends mini chocolate chips but I only had regular so I used what I had but I think the mini ones would be better.

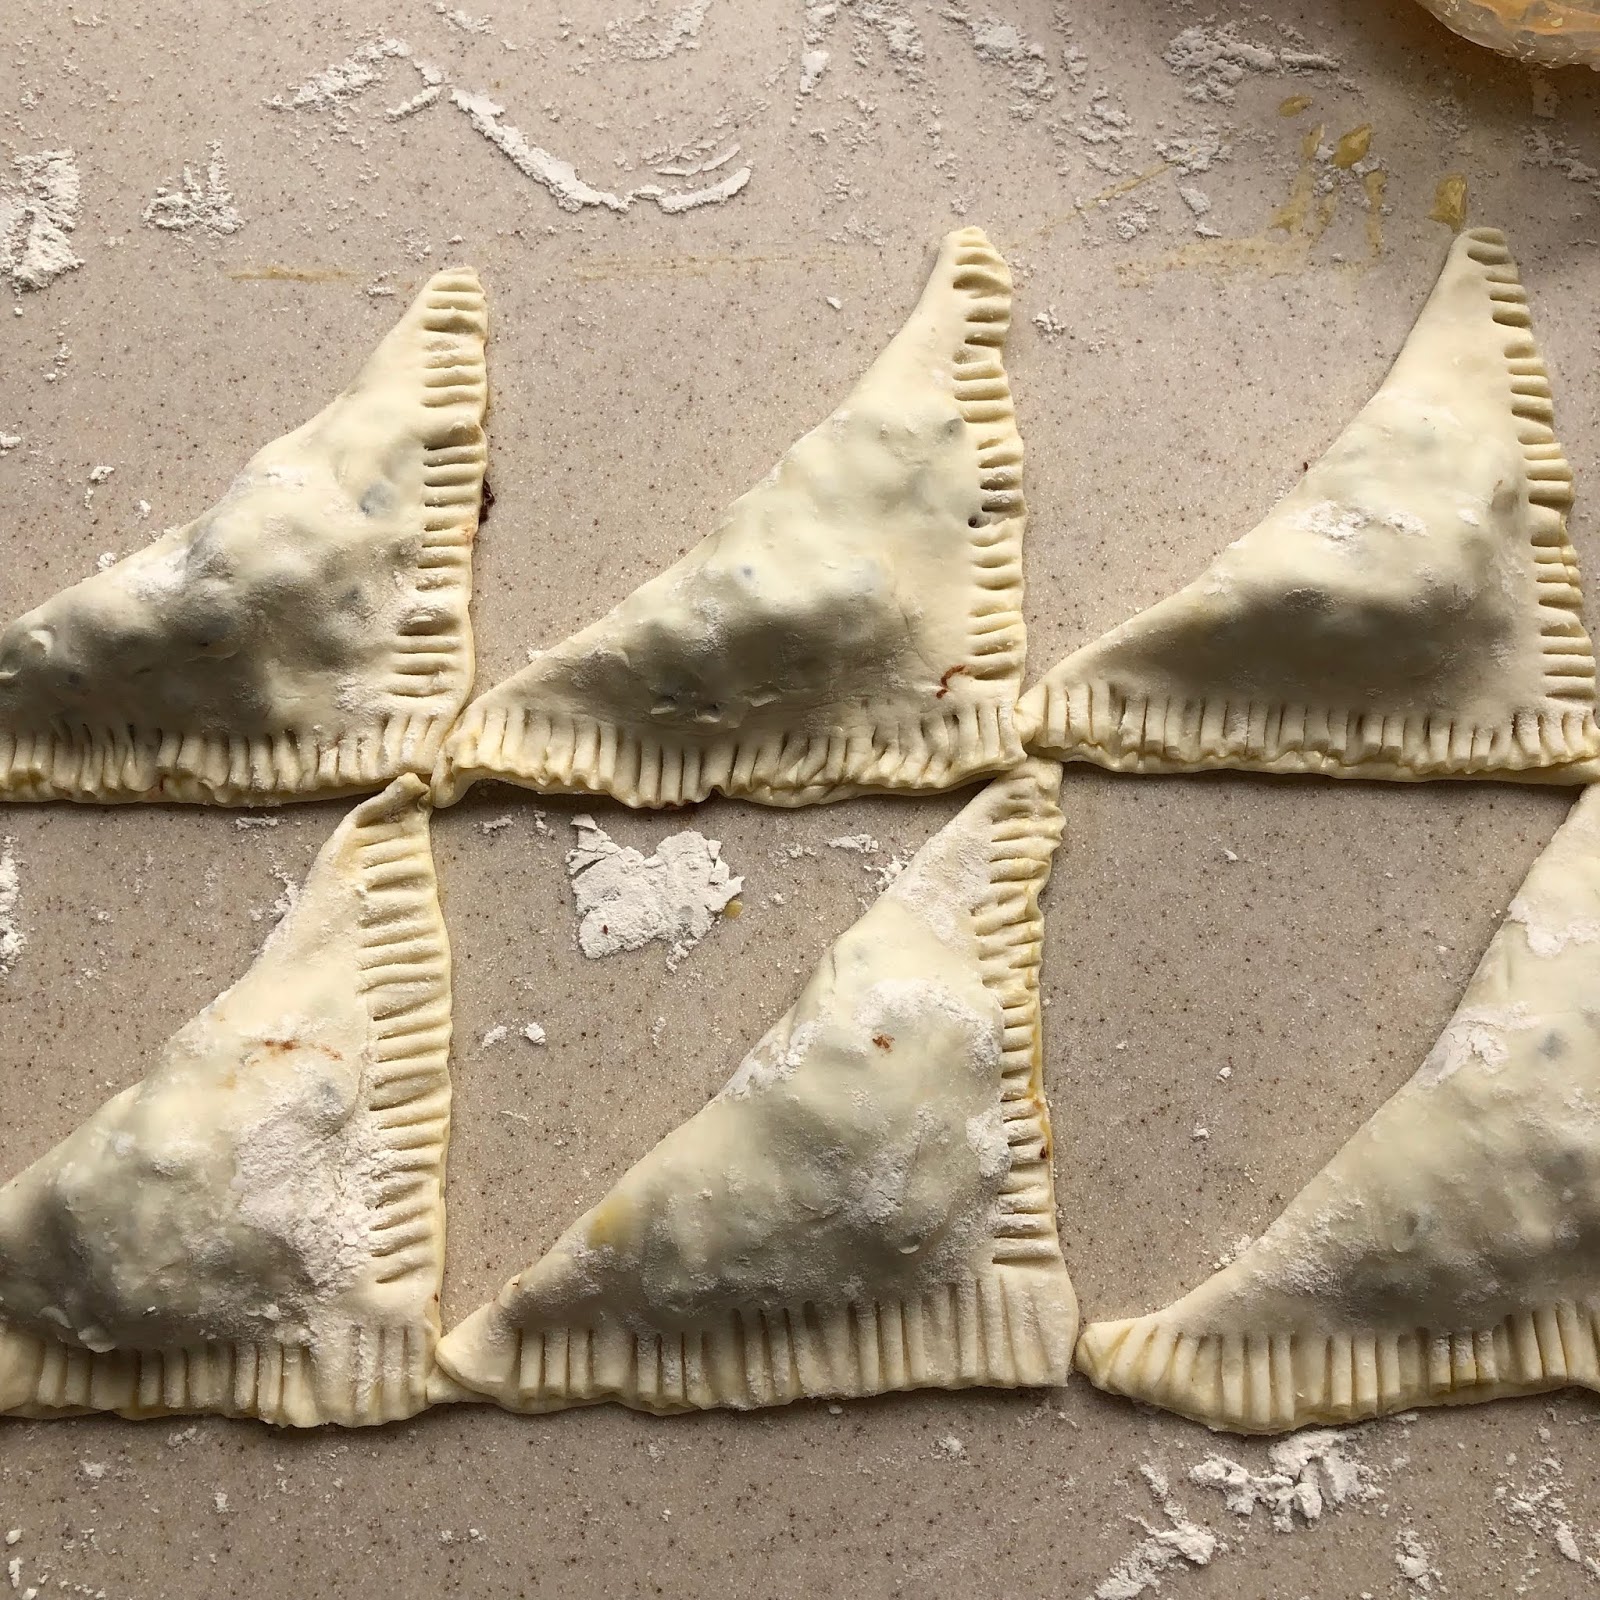
Next roll out your pastry (I didn't even have to do this bit as mine was already rolled!) and then using either the tip of a knife or a pizza wheel, cut the pastry into squares.


Then simply dollop heaped spoonfuls of the chocolate mixture into the middle of each piece, brush the edges with the beaten egg, and fold over corner to corner into a triangle shape.


Next take a fork and gently press down on the two open sides of each triangle so that all that delicious chocolatey filling doesn't escape and carefully transfer to a baking sheet lined with baking parchment.

Brush with more egg wash and bake in the oven for approx 15-20 minutes or when pastry is crisp and golden brown.  Transfer to a cooling rack and leave for 10 minutes (this was the hardest bit!  Trust me though, don't skip this bit unless you want to sear all the skin from the roof of your mouth!)


That's it!  How easy was that?!

Here's a short video of Bobby making these if you want to drool some more!  Click here

Give them a try this weekend - if you like chocolate I promise you won't be disappointed!

TTFN x


Thursday 7 February 2019

Keep on Truckin'!

Afternoon all!

Blimey, these blog posts are beginning to look a lot like buses aren't they?  There's none for ages and then two come along at once! Now that I'm back in the groove I didn't want to lose momentum so thought I would go right ahead and move along.

It's a cold day here in the desert!   It's not very often that I have to break out an actual jumper (or sweater depending on which side of the pond you are reading this) but today is one of those days.  Not only a jumper either, but jeans and furry Ugg slippers as well! Brrrr!  Still, I know we can't really complain compared to the weather almost everybody else has been having of late ... and at least we still have that blue, blue sky that I love so much here and bright sunshine.  Perfect!

Anyway, enough wittering about the weather and on to today's project - this adorable Vintage Truck!


I love making 3D paper craft items and am a big fan of the designs over at SVG Cuts since discovering them a few years ago. All the pieces are enclosed within a SVG (scaleable vector graphics if you're interested) file that you then cut out on an electronic die cutting machine (I used my Cricut Maker). All the projects that Mary, the designer, comes up with are just incredible and her attention to detail is second to none.   If you get chance, go on over to svgcuts.com and have a look - it's AMAZING what can be created with just paper and glue!  

I fell in love with this vintage red truck ...


and had fully planned to make it as a decoration for Christmas and maybe add a tree and some parcels in the back, but completely ran out of time 😐  I still wanted to have a go at making it though so thought I would try it in a different color.

After uploading the file to Cricut Design Space and cutting out all the pieces, (there were eleventy billion) I almost gave up right there and then when I looked at the pile and realized just how time consuming it was going to be to actually fold them all and glue them together!

aaaarrrghhh!
Determined, not to be defeated, and equipped with Mary's excellent video tutorial, I took a deep breath and got going.  Despite the huge number of pieces, it was actually fairly straightforward to put together (the most stressful part being the 30 minutes I spent rummaging through the bin after realizing I had chucked away the two tiny silver door handles thinking they were rubbish! 😩  Why I didn't just cut two new ones I will never know!)

truck body coming together ... complete with pesky door handles!
The best bit of advice I can give to anyone wanting to give it a go themselves, is to go slowly and take your time; use wet glue with a fine tipped nozzle and apply sparingly so that it doesn't all ooze out of the sides and if you get frustrated ... walk away and come back a bit later!  Those all worked wonders for me ... oh ... and swearing ... that helped a lot! 😂


Love it!
I love how it turned out!  You could totally adapt this for every season - maybe a pastel colored one filled with spring flowers or some decorative eggs for Spring would be nice?

Thanks for stopping and see you next time.
TTFN x

Wednesday 6 February 2019

Star Struck!

Greetings Crafty friends!

If there's anybody still out there, welcome back to the Crafty Cowshed and if you're just joining for the first time - Welcome along!  

Now I know some of you are thinking "Where the hell have you been? ... it's been 18 months woman!" and you're not wrong, it has.  I wish I could offer some plausible excuse ... I accidentally stumbled into Narnia whilst cleaning out the wardrobe and couldn't find my way back ...  I popped into the wrong telephone box after one too many margarita's and have been helping Dr Who with his identity crisis, or perhaps the most believable living in the Arizona desert ... I was abducted by aliens and have been instructing them in the art of British sarcasm which clearly took a while (still don't think they got it to be honest).  Sadly though, I've got nothing.  I have still been making the odd crafty project but somehow just didn't seem to have the time or motivation to document them in any great detail.

I don't really do New Year's Resolutions as such, but I did adopt CREATE as my word for 2019 as I didn't manage to do that as much as I would have liked in 2018.  Now that The Teen is driving himself to school and back every day, gulp, and my two year PTO rotation is over **large exhale** I find myself with a little more free time and thought it was high time to give the crafty blog some love.

Which brings us to right now.  As some of you may already know, Mr Crafty Cow likes to send a  handwritten note every month to the top performers in each of his teams at work to congratulate them and let them know how much they are appreciated.   When he started this some three years ago, I offered to hand make these for him and it has been fun trying to come up with a different theme and sentiment (how many ways are there to say 'Well Done'?!) each month, despite the quantity gradually increasing from the original 8 per month to 10, then 12 and is currently standing at 14!  Apparently, it has now become a popular and coveted monthly tradition and I have in turn received cards and photos from some of those who have 'won' several, showing them proudly displayed on their desks and even dedicated shelves at home!  How lovely!   I am more than happy to make them but it is also so nice to know that they are appreciated by those that receive them :)

Inspiration for January's card design came from something I saw on Pinterest (where would we be without Pinterest?!) which featured hearts.  I like to try and link or at least shout out to the creator of the original inspiration wherever possible but I can't for the life of me find it again now! Sorry :(

I thought it would be cute with the hearts swapped out for stars as I thought it would fit with the whole New Year, New Goals, Reach for the Stars etc. theme.


Yeah ... I didn't really think that through.  Making one card with 4 cute stars hanging from bakers twine was a great idea. Making 14 cards with 56 'not so bloody cute after the first 8' stars and a mass of tangled bakers twine which all frayed at the edges and wouldn't feed through the tiny holes ... not so much as it turned out.  LOL


The rest of the card came together quite easily though with the help of the latest addition to the Crafty Cowshed, my beautiful Cricut Maker (cue angels singing).  It does all the things my Cricut Explore Air did, but cuts faster, more precisely and almost every conceivable material under the sun ... chipboard, wood, leather, foam ... LOVE it!


I always make my card bases from a solid 110lb letter sized cardstock, currently using the white from Recollections,  and simply cut one piece in half to make two card bases, scored down the middle.    The patterned papers were from Echo Park's Here & Now collection by Lori Whitlock, and I made the sentiment with the Print & Cut feature in Cricut Design Space.  Another new feature of the Cricut Maker is that this feature can now be used with colored paper .... YESSSS!

I'll be back soon to show you February's card, plus a 3D project I have been making!  Make sure you hit the Facebook 'Like' button on the right hand side to follow the Crafty Cow Facebook page or enter your email address if you would like to receive notifications of new blog posts.

Thanks for visiting and look out for more new posts on all things paper ... with a smattering of recipes and other crafty projects thrown in for good measure!

TTFN x