Pages

Monday 28 September 2015

Card Concept Challenge #40


This week's challenge over at the Card Concept is entitled 'Forest Friends'.  I am really loving these challenges and especially like having a specific theme to work with.   I find I can easily get stuck in a creative rut and having a theme or color palette to work with really helps and makes me step outside of that comfort zone!


I thought I would try a different style this time and went with  'Freestyle Collage' to make a cute forest scene.  All images were cut from the Cricut Camping Critters cartridge and I particularly loved the bear and the deer hiding behind the trees so started with those.  I thought they looked like they were playing Hide & Seek and so when I then saw the fox and the owl with binoculars and a spy glass, I knew I had to have those too! I did struggle a bit with the sentiment, but then remembered I had this one from a Stampin' Up stamp set, which I thought continued the 'friends' theme rather well ... phew!

Supplies used:
Cricut Camping Critters cartridge
Bazzil Cardstock (for the characters and trees)
Patterned papers are both from the We R Memory Keepers 'Jet Set' paper pad
Sentiment from 'Sheltering Tree' stamp set by Stampin'  Up
Gems & velvet ribbon both from my stash

Thanks for taking the time to drop by and hope to see you again!

Bev x


Be Thankful!


A quick card today created using the turkey and sentiment from the Cricut Create a Critter cartridge.  

I made a standard A6 size card base (by cutting a piece of A4 in half and then folding down the middle) using plain kraft card and then created a double mat using chocolate brown card and a patterned paper from a 6" x 6"Basic Grey Paper Pad called Life of the Party.  I created a second double mat approx 4.5" x 2", using the same chocolate brown card and another paper from the same Basic Grey stack.  This one has a lovely wood grain effect which I thought was just right for this Autumnal card.  Finally, the turkey was cut at 3.5" and added along with the sentiment using some foam tape to create a little dimension.

I am entering this card into this week's Cardz TV Challenge #3 - Fall Icons.

Thanks for stopping by and have a great week!

Bev x

Monday 21 September 2015

Color Therapy ... !


Hands up those who loved 'colouring in' as a child?  Thought so ... me too!  I remember that sense of utter joy when I received a brand new set of felt tips, all juicy and rich, or some new coloring pencils ...  I can still recall the year I received a big tin of Caran d'Ache pencils in my Christmas stocking (well, actually it was a pillow case).  I can see them now,  all lined up in rainbow formation with pristine points, just begging for a colouring book (which Santa had also thoughtfully included!).

I haven't changed much and to this day am still a sucker for any kind of beautiful stationery ... from colorful pens - markers, watercolors, chalk or even sparkly glitter ones - to pretty notebooks and journals.   The other day I came across an article on the therapeutic qualities of coloring and how it is increasing in popularity amongst adults as a form of relaxation and stress relief, improving motor skills and increasing creativity (see link Health benefits of Coloring In).

I have never really stopped 'coloring in' and often use a hand colored image as the main focal point of a card or scrapbook page or sometimes just like to color for the sheer pleasure of it!  I have noticed that there are many Adult colouring books appearing in shops and online just lately (if you go to Amazon and search for  'adult coloring books', you will find pages of them!).  However, you can also find hundreds of free ones available for you to download and print off yourself, if you search for 'free adult coloring pages' via Google or on Pinterest.  As the football season is upon us once again, and Sunday night football monopolizes the TV, last night I decided to do just that and found this lovely owl.

I downloaded it and printed it off on some smooth white card and then colored it in with my Promarker alcohol ink pens - these are quite expensive (a present from Santa a couple of years ago!) but beautiful to color with and don't leave any 'coloring lines' like traditional markers.  They also have a fine tip at one end and a chisel tip at the other which makes coloring large areas much quicker.


I often get stuck choosing color schemes for my colored images, and so tend to use sites like Design Seeds for inspiration (they are also great for deciding on decorating color schemes!).  I loved the colors used in this one from houzz.com (which I found on trusty Pinterest) so selected the closest colours from the pens I had, in this case Forest Green, Leaf Green, Pastel Beige, and three pens from the Cool Grey set - 3, 4 & 5.


When I had finished coloring my ow1, I cut her out, matted her onto some plain green card, gave her some googly eyes and a sparkly silver bow and turned her into an easel card using a large white circular card blank I had in my stash.  I used my Cricut explore to print the sentiment and then cut the  label which I mounted on foam tape to act as the 'stopper'.

Why not have a go yourself and rekindle that love of coloring!  Just find yourself a free image,  grab yourself a set of pens/pencils/chalks/pastels ... whatever you like ... and get coloring!

(While you are at it,  type Zentangle into your search engine and have a look at those too ... you will be amazed at how much fun you can have with a piece of paper and a black pen ... plus you can color them in afterwards!  It's addictive!).

Sunday 13 September 2015

Hubble Bubble Toil & Trouble ...

I've been busy making more Halloween cards this weekend (because I send Halloween cards all the time ... LOL!) so thought I would share this one with you.


Inside of the card

I can't claim any credit for the design of this one I'm afraid, as once again the inspiration came from someone else via Pinterest (don't you just LOVE Pinterest?!).

The card is 5" square and made from plain black cardstock and all the decorative papers used are from the Spooky Delight card stack from DCWV - I got mine from Jo-ann's.  The frame, witches hat and spiders are all cut from the Cricut Happy Hauntings cartridge using my Explore (still completely in love with this machine!).

The frame was cut at 4", witches hat at 1.75", the large spider at 1" and the small spiders at 0.5".  The sentiment and the papers used inside were also taken from the Spooky Delight card stack.

Thanks for dropping by!
Bev x


Friday 4 September 2015

Happy Haunting .... !


As some of you will no doubt be aware,  I have always loved my Cricut (an electronic die-cutting machine, for those not already familiar), and used it frequently to make cards, titles and embellishments for my scrapbooking, and unusual gift boxes and even 3D decorations!

A year or so ago, Cricut brought out a shiny new version, called the Explore, which I had been coveting from the first time I clapped eyes on it.  It had a lot of new cool features including the ability to finally import SVG files at last, and bluetooth capability along with an iPad app so I could design on the go!  It was on my list for Santa last Christmas, but as our move to Arizona had already been confirmed by then, Mr Crafty Cow quite rightly pointed out that it would be much more sensible to wait until after we had moved and buy the US version.  Sigh ...

Well, I am pleased to say that a couple of weeks ago I finally took delivery of my new Explore and I have to say I love it even more than my old one! ... **squeaks with excitement!!**  As this also very nicely co-incided with Junior CC going back to school (funny that), I have been as happy as a pig in sh .... er ... mud ... locked away in my craft room putting it through it's paces and creating all kinds of projects. Bliss!

As you will probably know, Halloween is a HUGE deal over here and all manner of spooky paraphernalia - decorations, costumes and even complete sets of china! - started appearing in the shops early in August, so I figured that I would start with a few spooky projects of my own.

I saw a really cool hanging decoration on Pinterest from Mandie's Scrappin', which was made from some of those chipboard letters that you can buy at the craft store and then decorated with pretty papers etc., however, as I had my brand new shiny die-cutting machine sitting proudly next to me on the desk, I decided that this would be as good a test as any.

I cut the large letters from one of the free alphabets in the Design Space app in a heavy weight card, then just the same again in some decorative halloween papers which I stuck to the front of the card.  All the decorations were made using the Cricut Happy Hauntings cartridge, stuck to the letters and then the final step was simply to join all the letters together with some ribbon (stuck to the back of the card).  I was surprised at how quickly this came together and how straightforward it actually was!


I am really pleased with how it turned out.  Now all I have to do is wait until Halloween to put it up!

Thanks for stopping by!  See you next time for another spooky project!

TTFN
Bev x


Monday 20 July 2015

A lightbulb moment ...!

A little while ago, Mr Crafty Cow saw a motivational quote on a poster belonging to one of our friends who owns and runs Development Matters, a Management & Business Development  Consultancy back in the UK,  and instantly wanted one for his office at work.

After studying it for a while, I wondered whether I could possibly make something similar using my Cricut machine and so decided to have a play.  Mr CC wanted a smaller version in a frame that he could display on his desk (as those who know him will also know that he is severely 'DIY challenged' and therefore anything that requires hanging on a wall is a non starter!).

After finding a frame that he liked at our local Home Store which was 8" x 10", I went about creating the template in Cricut Craft Room.  I played about with the lettering from the cartridges I already owned, but in the end went with the font from the free Cricut Craft Room Basics as this seemed to work the best.   The original poster featured a crown,  however,  as I didn't have anything suitable on any of my cartridges (and buying a new one just for the one element seemed to defeat the object of the exercise) I decided to use a lightbulb image from the Cricut Alphabet cartridge (I just used the blackout image as I didn't want the swirly bits!).

I then cut it out from a red cardstock with gold foiling which came from the gorgeous DCWV stack called 'Dear Jane', and using the negative image, matted some plain white card behind it.  (This was infinitely easier than using the positive images and trying to line them all up exactly!).

Here's the end result ...


I am still not too sure about the light bulb and think I would have preferred a crown, but that would have increased the cost by at least another $20 for a new cartridge.  As it is, it just cost $9.99 for the frame and two pieces of card that I already had in my stash.  Mr CC loves it, which I guess is all that matters, but I am still undecided.  What do you think?

Here is the original piece owned by our friend (thanks Julia!) .... and if you are in the market for any coaching or leadership development, check out her website and testimonials over at Development Matters!


Sunday 5 July 2015

Card Concept Challenge #38


Whilst I have seen lots of challenges on the multitude of craft blogs out there, I have never submitted one before.  The latest post from the The Card Concept really caught my eye and motivated me to get out my stamps and ink and have a go.   Even if you don't feel confident enough to enter one of these challenges, they are great to get those creative juices flowing - hop and over and take a look!


This one is a color challenge - Yellow, White & Grey - which are colors I would never have thought to use together in a craft project.  This is what I came up with following I guess the 'Clean and Layered' style ...


Supplies used (all Stampin' Up unless otherwise stated) :

Cardstock in Hello Honey, Whisper White
Patterned paper - Moonlight DSP stack
Flower patch stamp set
Inks - Smoky Slate and Daffodil Delight
Flower Fair dies
Sentiment from Crazy About You stamped in Smoky Slate
A few crystals from my stash
Silver glitter ribbon - I think I picked this up at Tiger Tiger in the UK before we moved over :)

Hope you like it and thanks for stopping by.
Bev x


Wednesday 1 July 2015

Paper Roses

Hello Crafty Friends!

Now that we have settled into our new home in Scottsdale, Arizona (you can read all about that on my other blog if you are interested - just click here Barlow's Big Adventure) and all the boxes of crafty stash ... and trust me, there were A LOT! ... are finally unpacked and installed in my new craft room (which Mr Crafty Cow thinks is his study ... honestly), I finally managed to carve out some 'me' time this past week and scratch that crafty itch ... Yay!

As well as completing three Project Life pages (being behind is killing me!), I also made these cute pink sparkly roses, which I saw over on Dawns Stamping Thoughts.


She used a die from the Stampin' Up range, however, as I don't own that particular die but have a very similar image on my Cricut Flower Shoppe cartridge, I decided to use that and give it a go.

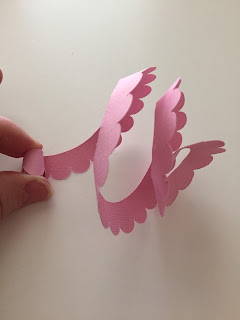
Tip:  If you don't have access to any dies you could still have a go at making one of these by drawing round a saucer or small plate and then cutting the spiral shape with scissors.  You obviously wouldn't get the scalloped edge and the width of the spiral would not be consistent, but that doesn't matter, it will just makes a more interesting flower shape - there are no rules in crafting!

First I cut the 'Basic Shape 1' at 5" from pink cardstock.


Next, I took a bone folder and gently shaped the paper to make it more pliable and easier to work with.  (I stress the word gently because if you tear it you will have to start again .... ahem)


The paper will curl up as you work your way around, but that's OK, just keep going.


Then, starting with the small end, start to roll it up tightly, until you reach the large circle at at the end.


You can now see your rose taking shape.  Let it go so that it unfurls a little into a more natural flower shape.


I turned it over and pressed down hard with the back of my hand to break down the fibres of the paper a little more and make it look a bit more 'distressed'.


Then, when you are happy with the shape, place a dab of good quality wet glue on the circle and hold it in place for a minute or so until it dries (I used Tombow glue but I also like Cosmic Shimmer as it doesn't stick to your fingers as much!)


Finally, I used a 2 way glue pen, to dab some glue on the petals, and then drenched it in some dazzling diamonds glitter.  Shake of the excess and .... Ta Dah!  A sparkly pink rose.


You could use this to embellish a special card (that you are going to hand deliver!) or put it on the front of a parcel or gift bag, but I decided to use mine to adorn the front of a cute Dress Box that I had been dying to make from the Cricut Tags, Bags, Boxes & More 2 cartridge.  Hope you like it!


Thanks for stopping by, and for sticking with me through the Crafty Mooo-ve!

TTFN
Bev x

Tuesday 17 February 2015

Crafty Cow is pausing for the big Moo-ve across the Pond!

Hi folks!

Sorry for the lack of posts recently but with all the preparations for our big move across the pond, my crafting has had to take a back seat over other priorities ... such as updating passports, getting visas, finding schools and not least somewhere to live when we get there!  Add to that a de-cluttering of gigantic proportions and that pretty much sums up my life at the moment.  I am planning to continue with the One Crafty Cow blog once we are settled (and my crafty stash arrives safely!) but for now hope you will understand and bear with me.

Meanwhile, due to several requests from friends and family, I have started a separate blog to record our move and document our first year in Arizona. So, if you are interested and would like to join us on the next part of our journey, then it would be great to see you over there! Here's the link Barlow's Big Adventure

TTFN
Bev x

Saturday 17 January 2015

A Sheltering Tree Through the Seasons

Another quick one today as I continue to grapple with black bins bags and the darkest regions of Narnia (also known as the back of the spare room cupboard).

I think I have fallen in love with the new Sheltering Tree stamp set from the Stamping' Up Spring/Summer 2015 catalogue!  It is a gorgeous set and ideal to make a quick & easy card for any season as you can dress up the tree in any way you like ... quick & easy works for me though :)  I have had a play and created a set of notecards for all four seasons, although I think I like the Spring one the best as Cherry Blossom is my absolute favourite!  Oh, if I close my eyes I can almost smell the heavenly scent of those puffy pink clouds of blossom ...... delicious!  Hopefully it will cheer you up too and remind us all that whilst the rain is lashing against the window and the wind is howling like a banshee, Spring really won't be far away!


Spring


Summer


Autumn


Winter


Stay safe in this nasty weather folks and if I spot Mr Tumnus or Aslan I will be sure to report back next week!

Cheers
Bev x

Saturday 10 January 2015

Perpetual Birthdays ...!

Well ... Operation Clear Out continues this week in preparation for our move to Arizona.  Cupboards are being cleared, drawers tidied and an assortment of old hi-fi equipment, games consoles, and exercise paraphanalia have made their way on to that great virtual marketplace that is eBay.  (I don't why I EVER thought an Aero Pilates machine was going to change my life... I seem to recall sitting on it watching the accompanying DVD, with a glass of wine in hand and munching a bowl of crisps ... snort ).   And suffice to say, if I ever have to so much as look at a paper shredder again it will be too soon!  Why is it that no matter how carefully you empty the basket thingy (that incidentally fills up faster than the Magic Porridge Pot) you end up surrounded by shredded paper and dust .... grrrrr!

Anyway, I do have a crafty project to share with you this week ... huzzah!


This was one of my pre-order goodies from the new Stamping' Up! seasonal catalogue released earlier this week (if you have not seen it yet just click on the link on the right hand side  .... scroll down a bit ... there you go!) - The Perpetual Birthday Calendar kit is one of the fab new items this season and as well as the fun you will have creating it, it would also make a lovely gift as it comes in a sturdy kraft gift box which can also be decorated.  The kit comes with pre-cut calendar pages, printed 1 - 31,  ready for you to decorate and lots of embellishments (including sparkly glitter and sequins ... oooh shiny!).  There is also an accompanying stamp set which can then be used year after year to make your own versions.

This is how I chose to decorate mine ...


Here is the co-ordinating stamp set ...


If you want to have a go at making one for yourself, just click on the links above to go shopping!

Right ... back to clearing out cupboards  ... yawn ... or maybe I'll just have another cuppa first ... :)
       
Have a good week everyone!
Bev x

Sunday 4 January 2015

Capture the little moments ...

Happy New Year!

I hope you all survived the holiday season and enjoyed the festivities.  In the Crafty Cow household, cards have been taken down, glitter vacuumed up & decorations packed away for another year.  Whilst I was truly sad to say goodbye to all the colour and sparkle (I LOVE Christmas!), there is something quite satisfying about restoring order and calm to the household at the start of a brand new year.  When I say 'calm', I am talking metaphorically in this instance as currently I feel anything BUT calm!  Let me explain ...

A couple of weeks before Christmas, it was confirmed that Mr CC had been successful in securing a new job.  An exciting new role with his existing Company ... a promotion, no less ... in Arizona ... wait ... WHAT?!  Obviously we had discussed at great length when the possibility first arose and we had decided that it would be too good an opportunity to pass up and (hopefully) a wonderful experience for us as a family, but we never really believed it would actually happen! Now that the distraction of Christmas is over and the reality has well and truly sunk in, I am starting to slightly panic about how much there is to do and organise! I seem to be on an emotional see-saw .. one minute very excited and the next utterly terrified - especially at the thought of having to leave beloved friends & family behind.  Gulp!

Given all of the above, I have had little time to get any new projects together to share with you, so thought I would share a fun 'Photo A Day' challenge from an Autralian blogger called Fat Mum Slim that I recently came across.  You can read all about how it works on her blog post here but basically it is a series of daily prompts (provided a week at a time) to encourage you to capture a photo a day and record those little moments.  For example, the prompts for this coming week are

Mon 5th - Square
Tue 6th - Round
Wed 7th - Currently Reading
Thu 8th - Landscape
Fri 9th - Pattern
Sat 10th - Hello
Sun 11th - I see ...

Have a look at her latest blog post here for examples.  You can play along by sharing your photos on Instagram or Facebook using the hashtag #fmsphotoaday (and search on this tag to see what others have taken if you are nosey like me!) and if you are an iPhone or iPad user you can also download a handy little app called Little Moments which as well as providing you with the daily prompt reminders will also allow you to add fun text and graphics to your photos.  Not sure whether I will be able to commit to playing along every day, but will certainly be using the prompts to inspire me with my Project Life photos, which I will definitely be continuing throughout 2015 as we embark on our American Adventure!

Have a fun photo snapping week! I'm off to clear out the cupboard under the stairs (Harry Potter could be living in there for all I know, it's that long since I last looked!)
Bev x