Pages

Showing posts with label Tags Bags Boxes & More2. Show all posts

Wednesday, 1 July 2015

Paper Roses

Hello Crafty Friends!

Now that we have settled into our new home in Scottsdale, Arizona (you can read all about that on my other blog if you are interested - just click here Barlow's Big Adventure) and all the boxes of crafty stash ... and trust me, there were A LOT! ... are finally unpacked and installed in my new craft room (which Mr Crafty Cow thinks is his study ... honestly), I finally managed to carve out some 'me' time this past week and scratch that crafty itch ... Yay!

As well as completing three Project Life pages (being behind is killing me!), I also made these cute pink sparkly roses, which I saw over on Dawns Stamping Thoughts.


She used a die from the Stampin' Up range, however, as I don't own that particular die but have a very similar image on my Cricut Flower Shoppe cartridge, I decided to use that and give it a go.

Tip:  If you don't have access to any dies you could still have a go at making one of these by drawing round a saucer or small plate and then cutting the spiral shape with scissors.  You obviously wouldn't get the scalloped edge and the width of the spiral would not be consistent, but that doesn't matter, it will just makes a more interesting flower shape - there are no rules in crafting!

First I cut the 'Basic Shape 1' at 5" from pink cardstock.


Next, I took a bone folder and gently shaped the paper to make it more pliable and easier to work with.  (I stress the word gently because if you tear it you will have to start again .... ahem)


The paper will curl up as you work your way around, but that's OK, just keep going.


Then, starting with the small end, start to roll it up tightly, until you reach the large circle at at the end.
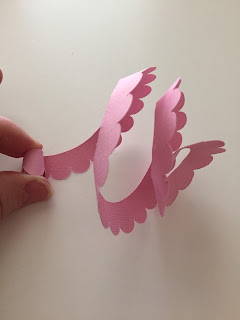

You can now see your rose taking shape.  Let it go so that it unfurls a little into a more natural flower shape.


I turned it over and pressed down hard with the back of my hand to break down the fibres of the paper a little more and make it look a bit more 'distressed'.


Then, when you are happy with the shape, place a dab of good quality wet glue on the circle and hold it in place for a minute or so until it dries (I used Tombow glue but I also like Cosmic Shimmer as it doesn't stick to your fingers as much!)


Finally, I used a 2 way glue pen, to dab some glue on the petals, and then drenched it in some dazzling diamonds glitter.  Shake of the excess and .... Ta Dah!  A sparkly pink rose.


You could use this to embellish a special card (that you are going to hand deliver!) or put it on the front of a parcel or gift bag, but I decided to use mine to adorn the front of a cute Dress Box that I had been dying to make from the Cricut Tags, Bags, Boxes & More 2 cartridge.  Hope you like it!


Thanks for stopping by, and for sticking with me through the Crafty Mooo-ve!

TTFN
Bev x

Wednesday, 30 July 2014

Anyone for Tea?

So this week, as it has still been too hot for me, I have been hiding in my craft room and playing with some more of my Cricut Cartridges.  I had recently purchased the digital version of the Tags Bags Boxes & More 2 cartridge to use with the Cricut Craft Room but not experimented with it as yet so thought I would give that a go.

I bought the scoring tip, recommended for use with this cartridge quite a while ago whilst on a trip to the US, thinking "that will be useful" and then promptly put it away in a drawer, never to see the light of day again ... until now.    There were several moments of utter frustration **not to mention a string of expletives**  as it kept leaving raggedy edges and ripping the paper and I couldn't work out why.  I tried adjusting the pressure and blade depth but the result was still the same.   After several ruined pieces of paper and much searching on t'Interweb I discovered that I had I had in fact ... erm ... fitted it upside down ... ahem.  **In my defence m'Lord ... er ...nope ... I got nothing ..**  Once that was sorted it worked like a dream!

After experimenting with a couple of small basic boxes, I decided to give the tea cup and saucer a whirl. I used some double sided card stock that I have had in my stash for ages (think it may have been from a kit that I bought at Costco several years ago) and added a border from the Elegant Edges cartridge and a doily from the Cricut Alphabet cartridge.  I finished it off with some flowers that I had made previously with some leftover paper from  LOTV's Paper Pad- Always and Forever and a scrap of checked ribbon from American Crafts (also from my 'leftover bits' box).

This was the result.


I thought this would make a nice gift for a friend with perhaps a couple of those individually wrapped specialist tea bags inside, and maybe a cup cake to go with it?  **hmmm.. will have to dig out the Sweet Tooth Boxes cart next and try one of those **.  What do you think?

I also got round to using one of the little deer characters that I shared in last week's blog.  I decided that he needed some woodland friends and so made him a few companions (again using the Create a Critter cartridge) and created another of the pop up box cards which seem to be all the rage at the moment.


Thanks for stopping by and hope you can join me again next time!  (There are lots of ways you can follow my blog ... check out the various options above over in the right hand column).

TTFN

Bev x